UPDATE - Extended to March 31st. Now Is The Best Time To Buy onOne Software.For 3 days only, you can get your favorite onOne product at a huge discount, but only if you purchase from the above webpage (click on the above graphic) by March 29th.You'll have peace of mind knowing that you get free video training, free webinars, weekly inspiration video episodes, world-class technical support and a 30-day money back guarantee. Get a new product or upgrade your favorite product today!
Monday, March 25, 2013
Spring Sale Up to 40% off onOne Software
UPDATE - Extended to March 31st. Now Is The Best Time To Buy onOne Software.For 3 days only, you can get your favorite onOne product at a huge discount, but only if you purchase from the above webpage (click on the above graphic) by March 29th.You'll have peace of mind knowing that you get free video training, free webinars, weekly inspiration video episodes, world-class technical support and a 30-day money back guarantee. Get a new product or upgrade your favorite product today!
Tuesday, March 5, 2013
onOne Perfect B&W + Perfect Effect 4 $100 Off
Sales goes live March 6th, 10 AM PST and ends Midnight March 8, 2013 PST.
Get Perfect Effects 4 Premium and Perfect B&W Premium for only $99.95 ($100.00 savings) For 2 days only, you can get the best photographic effects software - Perfect Effects 4 Premium Edition and the all-new Perfect B&W Premium Edition for stunning black and white effects.
Create your masterpiece in minutes with a huge library of effects and creative tools in both of these powerful new products. Achieve classic black and white looks with full control of shadow, hightling, and selective color, and create a unique look of your own with professionally-created photographic effects, glows, textures, and borders. With the ability to stack, combine and blend effects, and paint in effects to specific areas, your creative options are endless.
Order now for only $99.95 - that's 50% off! As with all onOne products, you'll get a 30-day moneyback guarantee, world class technical support, and free online training including Live webinars and videos to get you up and running fast!
Sunday, February 24, 2013
Pro-Tip #3: Wildflower Photography
![]() |
| Flower Power, © Greg Clure |
Here are some tips to help you as you venture out this spring in hope of capturing some wildflowers:
- Know your species, research what you are shooting, some species close up at night and don’t open till the sunshine warms their petals, the California Poppy would be a good example. While most blooms are best shot during the golden hour some will need to be shot at mid-day. Also follow the internet blogs in your area to help you time your travels to peak bloom.
- Research the weather; you are looking for super calm days. Wind is the bane of wildflower shooters so go out on a calm day, you’ll get more keepers. Overcast days also make great days for shooting wildflowers as they tend to be less windy and less contrasty as nature provides the softbox. Also, the wind tends to die down at the beginning and end of the day. If you do find yourself stuck in the wind, don’t try to beat it, rather; accentuate it by using long shutter speeds and make some dreamy abstracts.
- Pay attention to the direction of your light. Most species will look great backlit which gives flower petals a translucent quality and adds a nice rim light emphasizing their form and helps separate them from the background as well as each other.
- Pay attention to your background. Nature can be chaotic and messy so look for a clean uncomplicated background; this will help direct the viewer’s eye to your subject flower. Can’t find an uncluttered background, get down low next to the ground and use the blue sky as your background.
- Look for complementary colors. Complementary colored flowers work to enhance each other by making each appear more vibrant than they would alone. Think cool blue lupine in a field of warm orange poppies or yellows flower fields against purple mountains.
- Get down on their level. If flowers were people you would shot them at eye level, when was the last time you shot someone from directly overhead?
- What setting should you use? You need to use fast shutters to freeze motion and wide-open apertures to blur your backgrounds for those specimen shots. Try 1/250 or faster and f/2.8 – f/4. Of course, you’ll need to use a small aperture for those grand scenic fields’ of wildflowers, try f/16 or f/22.
Monday, February 11, 2013
Thursday, January 31, 2013
Pro-Tip #2: Creating Depth
Depth or the feeling of depth is a compositional element used to trick the brain in thinking a flat piece of paper (or screen) has three dimensional qualities. Here are five common effects the pros use to create depth:
Relative Size Effect - Include a distinct foreground, middle ground, and background in your composition. Elements in the foreground look larger than those in the middle ground which look larger than those in the background creating a sense of depth. This is often accomplished with a wide-angle lens and by getting down low and close to your foreground which has the effect of making it appear larger than life while the middle and background appear smaller than normal accentuating depth.
| Cascade Detail, North Creek, Zion NP - © Greg Clure |
Elevated Effect - Often used in combination with the above effect, gaining elevation helps by visually separating the foreground, middle ground, and background, which makes perspective lines and size comparisons more apparent.
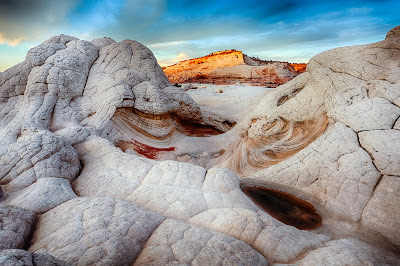
| Ice Cream, White Pocket - © Greg Clure |
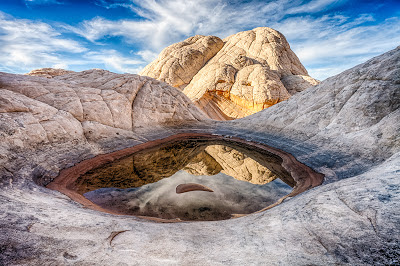
| Pocket Reflection, White Pocket - © Greg Clure |
Atmospheric Effect - The use of haze or fog creates depth by obscuring more distant objects even if those object are not all the far away.
![]() |
| Toroweap Sunset - © Greg Clure |
Juxtaposition Effect - While similar to the first effect discussed, this effect uses a prominent foreground juxtaposed to the background. The reduction or elimination of a middle ground creates a strong sense of depth by accentuating distance.
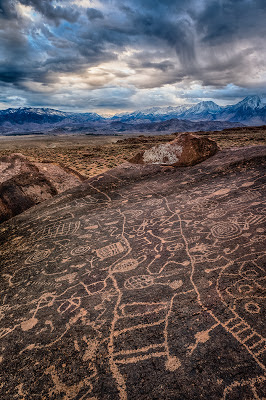
| Stormy Sierras - © Greg Clure |
Perspective Effect - Include leading lines, S-curves and converging lines in your images as these visual cues of perspective are easily associated with depth or distance.
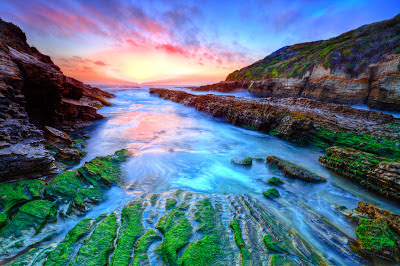
![]() |
| Playa de Verde - © Greg Clure |
So what are you waiting for, get out there and and capture that third dimension of depth in your landscape images and breathe some life into your two dimensional photos.
Pro-Tip #1: Back Button Focusing
While
many problems can be fixed in software after capture, focus or sharp
focus, is not one of them. Focus must be obtained at the point of image
capture as no amount of post-process sharpening can bring an
out-of-focus subject into focus. One way to gain better control over
your point-of-focus is to separate the focusing action from the exposure
reading when you fully depress the shutter button. Most all DSLRs and
many point and shoot cameras are capable of separating these two
functions. In the case of a DSLR, you can assign the focusing action to
one of the other buttons on the back of your camera, known as
"Back-button Focusing". This allows you to place your center focus
point, which is your most accurate focus point, directly on your subject
to obtain sharp focus and then re-compose the shot as desired gaining
the proper exposure for the re-composed scene when you depress the
shutter button. Not only will you begin to increase the number of
sharply focused images you are recording but you will also gain more
accurate exposure readings for your scenes. Review your camera manual
for instructions on how to set this up on your particular camera then
give it a try, it may take a while to get used to this new way of image
capture but the results will be much better and more controllable than
when both functions were engaged with the shutter button alone.
Monday, January 21, 2013
Black & White Processing
© Greg Clure
What images make good candidates for black & white (B&W) comversion? Any image with tonal contrast. What is tonal contrast? Tonal contrast are those areas of different luminacity. The best B&W candidates have many of these alterating tonal areas repeated throughout the image. This image of a water filled pocket in the White Pocket area of the Vermillion Cliffs has such characteristics. The white sandstone rock (a light tone) is broken up throughout the image by the darker shadow areas of the cracks (a dark tone) running between the rocks. The same thing is happening with the blue sky and white clouds and we see both repeated in the pool's reflection of rock and sky. The pool's concentric rings also has alternating light/dark tonality.
When converting images to B&W use an optimized color image in a RAW format for maximum control and detail. Since RAW images contain more information they can be pushed further than others. Once you have your color version looking its best, you can now convert to B&W. I have found that there is not faster and easier way to do this conversion than by using Nik Software's Silver Efex Pro 2. I also like to access Silver Efex from Photoshop which allows the use of Smart Filter technology which is a non-distructive means of applying changes that can be re-accessed at any time to make changes starting with all the controlls in the last place you left them. The presets available in Silver Efex make it fast to select a starting point, simply browse the presets and select the one that works best for your image. In the case of this image, I choose the Full Contrast & Structure preset. This however was a bit to contrasty for the sky area but not quite enough structure and contrast for the rock area. Using the global adjustments I brought down the brightness and bumped up the contrast and structure. I also added a red filter to futher enhance the sky by darkening the blue areas. Still wanting more controll over each area in the image I created a group of controll points for both the sky area and rock areas and further tweeked my contrast in the sky and structure in the rock. This conversion took me about 2 minutes to complete, thanks to Nik Silver Efex Pro 2. Nik offers a free 15 day trial version of any of their plug-ins and you can download (use download button in right column) it and give it a try on some of your images. If you like it, and I am sure you will, you can use my discount code, gclure, to recieve a 15% discount on your purchase at www.niksoftware.com. Or equally impressive is Black & White Effects from Topaz Labs who offers a dozen plug-ins for Lightroom, Photoshop and Aperture. The good news is you can download a free trial copy at www.topazlabs.com and compare it to Nik's and purchase the one that you find works best for you! The same discount code, gclure, will save you 15% on any Topaz product as well.
Subscribe to:
Posts (Atom)


