Wednesday, June 26, 2013

Pro-Tip #7: Tripods, Do I really need one? Which one should I get?


Do I really need one? Yes, but only if you care about the sharpness of your images.  Pros will generally use a tripod in most every instance possible.  The general guideline for hand holding your camera that will produce acceptably sharp images is 1 over the focal length of your lens.  So if you are shooting with a 200mm lens on a full frame 35mm SLR your minimum shutter speed for acceptably sharp images would be 1/200th of a second or faster.  If you are using a crop sensor camera than you will need to account for that factor by multiplying the crop factor by the lens’ focal length, so in the above example you would need to be at 1/300th of second or faster assuming you have a 1.5x crop factor.  As with any general guideline there are many other factor that could negate this guideline, such as shooting with a stabilized lens or camera body or using flash or perhaps you want to add blur by panning with your subject.  Do keep in mind that acceptably sharp does not mean tack-sharp.

Long exposure work will always require the use of a tripod. If you want to shoot streams or waterfalls and give the water that smooth silky look than a tripod is a must.  If you want to shoot stars or the Milky Way as sharp points of light or star trails than a tripod is a must.  If you want to shoot in low light without having to jack-up your ISO than a tripod is a must.  Bottom line, using a tripod will give you far more flexibility in your shot selection than not using one.

OK, I need a tripod but there are thousands of them on the market, which one should I get?  There are just a few simple considerations to selecting a tripod that is right for you.  First, you need a tripod and head combination that will support your heaviest camera rig (or rig you ultimately plan to own) times two.  So if your camera body, 400mm lens, 2x converter, remote shutter release and filter holder with filters, etc. weighs seven pounds than you need your tripod to support fourteen pounds at a minimum, more is always better. Second, you want a tripod/head combination to be high enough so that when you are looking through the view finder you do not have to bend over when the legs are fully extended and center column is in its un-extended position. Again, more height is always better. Third, you need a tripod that meets the above minimums but will be a weight and size you’ll be comfortable carrying to your shoot locations. If all you do is studio work than weight is not a factor but if you need to hike any distance to get to your shoot locations than this will be your mitigating factor on weight.  The materials a tripod is made out of will determine its overall weight and price.  Carbon fiber being the lightest and most expensive is your best choice if keeping the weight down is a major consideration.  More often than not, you’ll be purchasing a set of tripod legs and tripod head separately, but you may also find a popular legs/head combination sold as a package for a discount. So what head do I need?  You’ll use the same requirement as mentioned previously, if your legs support 15 pounds your head should support 15 or more pounds. If you primarily shoot stills than most pros find a ball head to be the best option. If you shoot a lot of video than a pan type head would be a better option.  There are many hybrid type options out there so if you shoot a good amount of both than take a look at one of those options. Since the head comes off, you can always switch heads depending on your needs.

A tripod is an investment, it will most likely last you a lifetime or at least through many camera bodies. Don’t make the mistake of buying a cheap one that is not adequate and upgrading to better one and find out it only works well in some situations then upgrading to a good one that meets most of your needs before finally plunking down the cash on the one you should have purchased from the get go.  By the time you are on your third or forth tripod, you could have paid for the right one. As the old saying goes, “you get what you pay for”, so buy the right one the first time you’ll have sharper images from the start.

Where do I buy my Tripod? I would recommend Adorama.

Tuesday, June 25, 2013

Summer Plug-ins Specials

onOne Software is running a 50% off special, which has been extended through June 30th. Click on the graphic below to learn more.  

Topaz if offering their 10 plug-in bundle, which normally sells for $299.99, for just $199.99 now through July 7, 2013. Click on the graphic below to learn more.

Tuesday, June 4, 2013

onOne's Perfect Photo Suite 7.5 - Now Availble!

Portland, OR – June 4, 2013 – onOne Software, Inc®., the leading developer and provider of photo effects for everyone, today announced the availability of Perfect Photo Suite 7.5 for Adobe® Photoshop®, Adobe Photoshop Lightroom, Adobe Photoshop Elements, Apple® Aperture®, and as a standalone application. The update includes a new Quick View Browser, refinements to the Perfect Brush, tested compatibility with the upcoming Lightroom 5, performance improvements, and general bug fixes. Also included since the initial launch of Perfect Photo Suite 7 are tools that tackle problems commonly encountered in photo editing—Red Eye reduction tools and a Clone Brush that removes distractions.

“We are happy to deliver these new updates in Perfect Photo Suite 7.5,” said Craig Keudell, president of onOne Software. “They are part of our continuing efforts to improve our software. We are a small company, made up of photography lovers, and we’re always looking to improve what we do and how we do it to support photographers of all skill and interest levels to help them create the images they love.”

The updates in Perfect Photo Suite 7.5 include:

Quick View Browser: The Quick View Browser gives users the ability to see all of their images, effects or presets in a full-screen gallery. In Perfect Layers, it makes it easy to browse image folders and quickly navigate through images. In Perfect Effects and Perfect B&W, the Quick View Browser showcases effects or preset categories on an image at one time, making it easy to compare and select amongst them.
Perfect Brush Improvements: Refinements have been made to the Perfect Brush to give users even more control. Previously, the Perfect Brush only allowed for continuous sampling of colors under the center of the brush while performing edge-detecting masking. Now, it can lock on a sampled color while masking, which is helpful when brushing through complex areas such as branches and window panes.

Red Eye Reduction Tools: Two solutions for red eye reduction are available in Perfect Photo Suite 7.5. In Perfect Portrait, red eye reduction is built into the automatic face detection feature. In Perfect Layers, the Red Eye tool is available as a brush, which can be dabbed to remove red eyes caused by flash photography.

Clone Brush: The Clone Brush quickly and effectively removes distractions in photos, such as power lines or people. The brush feather and opacity may be adjusted, and any shape or object may simply be painted over.

Find more information on the updates in Perfect Photo Suite 7.5 at www.ononesoftware.com/blog

With continued support for Aperture 2.1 and 3, Photoshop CS6, CS5 and CS4, Lightroom 4, 3, 2 and the upcoming Lightroom 5 and Photoshop CC, Perfect Photo Suite 7.5 includes:

  • Perfect Effects 4 extends the creative power offered by the popular PhotoTools and provides even more ways to create images with impact. Perfect Effects 4 delivers an extended library of professional photographic effects, frames and edges accessible from a flexible browser with keyword search functionality and Favorites selection. Blending modes and paint-in brush effects offer even more creative options for how effects are combined and applied.
  • Perfect B&W helps photographers develop stunning black and white images quickly and easily. It includes powerful and intuitive tools that add dramatic, elegant, and classic black and white looks to images instantly and offers users complete creative control to reproduce time-honored black and white processing techniques.
  • Perfect Portrait 2 offers simply power portrait retouching, with automated feature detection and enhancement tools to smooth skin, remove blemishes, brighten eyes and teeth, and correct skin color. Fast processing speeds also allow photographers to retouch images quickly for simply stunning portraits.
  • Perfect Layers 3 gives photographers the ability to combine images and extend their image editing options in a layered file workflow without Photoshop. Users can create and edit multi-layered files with Perfect Layers directly from Lightroom, Aperture or as a standalone application. Also included are blending modes, textures, borders, PNG file support, and the powerful edge-detecting Perfect Brush.
  • Perfect Resize 7.5 is the industry standard for image enlargement. It is renowned across the photographic and printing industries for its ability to increase image size well over 1000% without the loss of sharpness or detail that is normally expected. Proven Genuine Fractals® technology has been applied to algorithms that optimize the clarity and detail of different image types, including mobile snapshots.
  • Perfect Mask 5.2 creates high quality masks quickly and easily with automated functionality and powerful tools that make selecting subjects and isolating backgrounds for removal extraordinarily accurate.
  • FocalPoint 2: FocalPoint 2 allows photographers to put the focus where they want after the shot. It’s the best way to add the most realistic depth of field and selective focus control to any image after it is photographed. Choose from a selection of lens presets to produce specific bokeh or adjust the amount and kind of blur you want.

Availability
Perfect Photo Suite 7.5 is now available from onOne Software. Existing owners of Perfect Photo Suite 7.x are eligible for the update at no additional cost. For a limited time, new users may purchase the Premium Edition for $199.95 (Reg. price $249.95) or the version for Lightroom & Aperture for $99.95 (Reg. price $149.95). The Standard Edition, which only works as a standalone, is available for $79.95. Owners of previous versions of Perfect Photo Suite can upgrade to the Perfect Photo Suite 7.5 Premium Edition for $99.95 (Reg. price $149.95) or the Lightroom & Aperture Edition for $69.95 (Reg. price $79.95). For more information on the Perfect Photo Suite 7.5, please visit www.ononesoftware.com.

The free update for existing Perfect Photo Suite 7.x owners may be downloaded from www.ononesoftware.com/support/suite7. Owners must make sure they are downloading the correct update for the edition they own. There are separate update installers for Perfect Photo Suite 7 Premium Edition, Perfect Photo Suite 7 for Lightroom & Aperture, and Perfect Photo Suite Standard Edition.

About onOne Software
onOne Software, Inc., is a leading developer of photo effects software and apps for anyone who enjoys making their pictures look great. onOne Software products include effects and presets that enhance and stylize images with sought-after photographic looks of yesterday and today, and powerful photo editing tools that allow users to fine tune the effects—to create personalized and unique looks of their own. They are designed to help users create amazing images wherever and whenever they are taking pictures, on any device.

onOne Software solutions include a range of easy-to-use desktop standalone applications; plug-in software for Adobe Photoshop, Photoshop Elements, Photoshop Lightroom, and Apple Aperture; apps for the iPhone® and iPad®; and Lightroom presets. Founded in 2005, onOne Software is a privately held company located in Portland, Oregon. For additional information, visit www.ononesoftware.com.

Visit my website's Software Discount pages for this and other quality image editing products and their their discount/coupon codes because nobody likes paying full price.

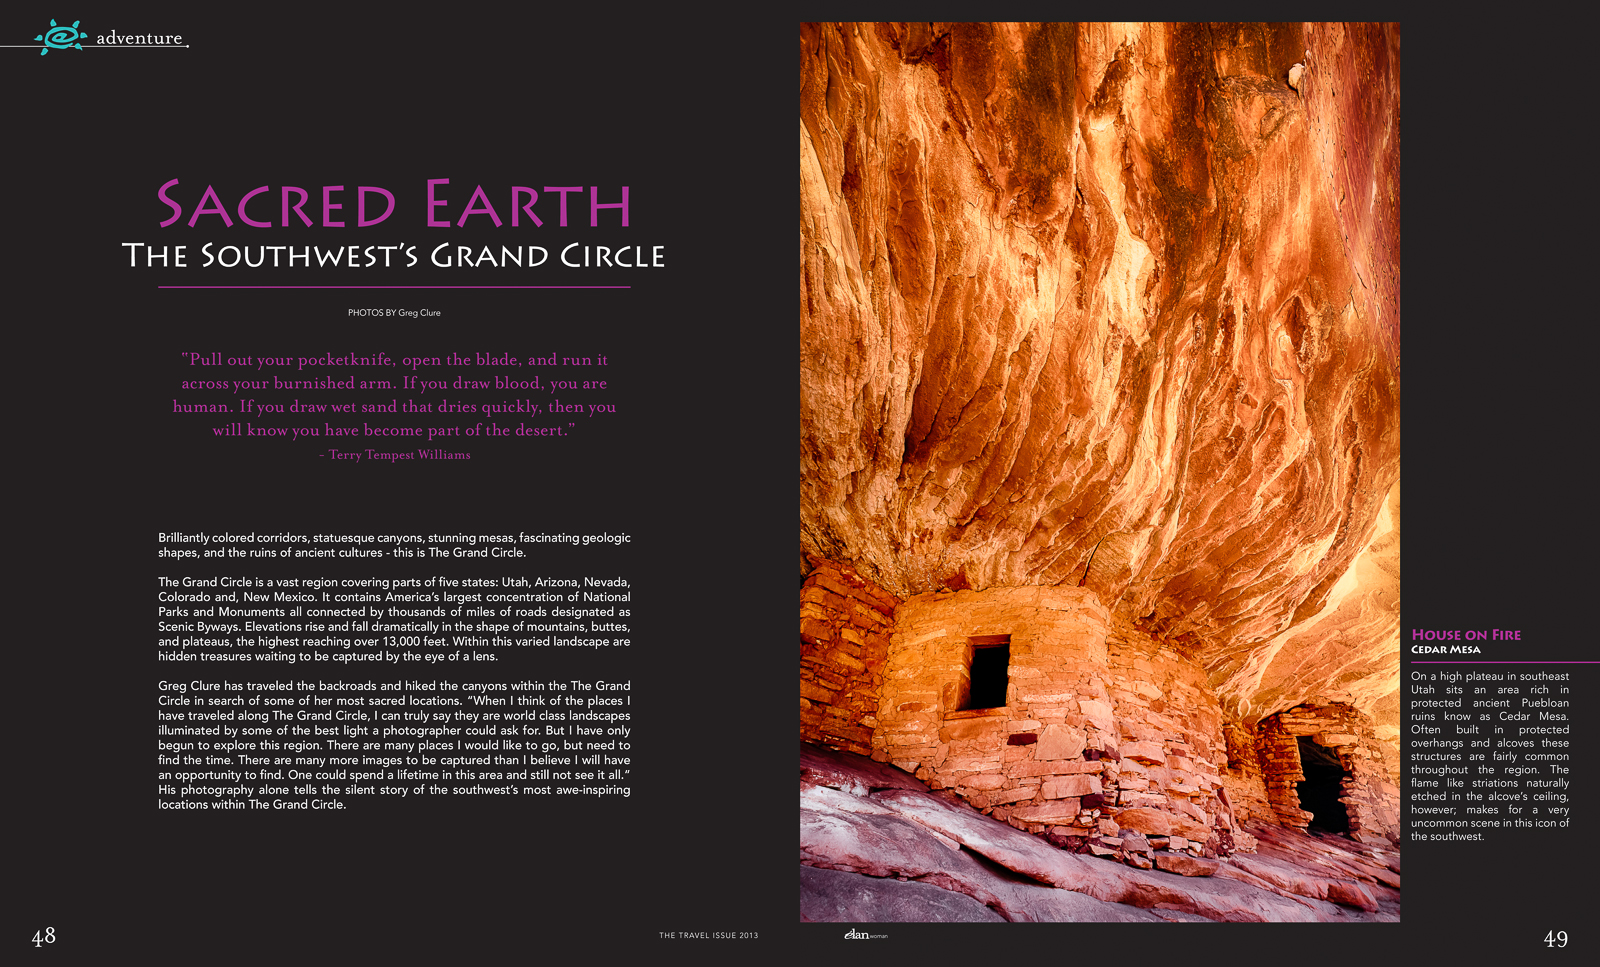
Elan Magazine features 7 of My Images

Opening Two-Page Spread of "Sacred Earth, The Southwests Grand Circle"

Seven of my images are currently featured in the May-June 2013 Issue of Elan Magazine's article "Sacred Earth, The Southwest's Grand Circle", a regional southwest publication. You can view all six pages in my Awards & Recognition Gallery. The "Grand Circle" is a vast and beautiful region located in the Southwestern United States. Encompassing portions of five states – Arizona, New Mexico, Colorado, Utah and Nevada – the Grand Circle contains America’s largest concentration of national parks and monuments, woven together by extraordinary designated Scenic Byways. Some of America’s most diverse scenery can be found within the Grand Circle – the Grand Canyon, Zion National Park, Bryce Canyon, Lake Powell and Arches National Park, just to name a few. Bold splashes of color, fascinating geologic shapes and the mysterious remnants of cultures await you at every turn.

Pro-Tip #6: Plan Your Shot - The Photographer’s Ephemeris (TPE)

Planning is an important activity you need to do to increase your chances of getting great shots. No app is more useful than TPE for outdoor photographer's. The Photographer’s Ephemeris helps you plan outdoor photography shoots in natural light, particularly landscape and urban scenes. At it’s core is a map-centric sun and moon calculator allowing you to visualize how the light will fall on the land, day or night, for any location on earth. It’s a fantastic app and I use it all the time, even for planning trips months in advance as it helps me to work out where to go on which day to get the best light or include the moon in my images. Features include:
  • Time and direction of sunrise, sunset, moonrise and moon-set
  • Phase of the moon and % illumination
  • Times of civil, nautical and astronomical twilight
  • Graphical display on a wide selection of map types
  • Movable map pins – drag and drop the pin exactly where you need it
  • Compass display built-in for scouting in the field (on compatible devices)
  • Shadow lengths displayed to scale on map
  • Save any location you want – no fixed lists
  • Key celestial events for the year, including moon phases, solstices, equinoxes
  • Does not require network connection for rise/set time, azimuths and sun/moon position
TPE takes the guess work out of working out where the sun will be and hence how shadows will fall allowing you to have a good idea of what angle you need to shoot from. You can download a free Windows or Mac desktop version at www.photoephemeris.com or buy the app for your smart phone or tablet.

Thursday, May 23, 2013

Topaz Clarity only $29.95! – Topaz Labs Newest Plug-in!


Topaz Labs released a new plug-in called Clarity which is designed to give your flat images more punch! Here’s more info in their own words:
Topaz Clarity is the ultimate tool to create compelling and powerful images by intelligently enhancing contrast and clarity with absolutely no artifacts or halos.  With just a few clicks you can easily manipulate your micro, mid-tone and overall contrast, trans- forming your image from ordinary to extraordinary, while maintaining the natural feeling and tonality you are after.   Using a proprietary technology, Topaz Clarity effectively improves local contrast without halos or noise, giving you remarkable results with minimal effort.
Here are some of the unique features introduced in Topaz Clarity:
  1. Selective Contrast Control. With Clarity, we have developed a cutting-edge process of selecting specific contrast variations in your original image, allowing you to quickly target and then increase or decrease the contrast and clarity in that specific variation.
  2. Breakthrough Halo-Free Algorithm.  Boost contrast and clarity without emphasizing transitions between light and dark areas, eliminating the common problem of halos, noise and artifacts.
  3. Advanced Hue/Saturation/Luminance Technology.  Using IntelliColor technology, you can easily enhance your image with the HSL filter, getting stronger, yet more natural HSL adjustments.
  4. Re-Imagined Masking Workflow.  The masking module, now attached to each adjustment tab contains a comprehensive set of tools including an edge-aware brush, gradient mask, smart feather tool, color aware tool and more.
  5. User Interface Design.  With Clarity, we have continued to develop a cleaner, more modern and efficient interface to improve usability, workflow and overall aesthetics. Here’s a peek at the new UI:
UI3
Here’s a look at the new masking technology:
UI_MaskMode

Special Introductory Offer

Click here and use the coupon code "claritynew" until May 31st to get Clarity at a special reduced price of $29.99, that $20 off the regular price of $49.99. See my discount coupon code page for my discount for use with ALL Topaz products - including the best deal for the bundle.

My Test

Topaz Clarity is like using the Lightroom Clarity slider on steriods. You can take images much further and have more control over your results. I often backet my exposures to use in HDR processing in order to extract the kind of localized contrast and fine detail the tone-mapping process can bring out in an image.  Clarity seems to be able to do this without the need to bracket and process in HDR.  I going to start using this program more and HDR less because it is quiker, simplier and provides more realitic results.  After all, I would rather be out shooting images than sittting at the computer processing them.

Sunday, April 28, 2013

Pro-Tip #5: Focus Stacking


On last month’s Big Sur Photo Workshop Tour I wondered upon a scene that required this technique. It’s not difficult to do and anyone with a manual focus capable camera/lens can take advantage of it, thanks to Photoshop. The scene was a small patch of Periwinkle under a group of cypress trees with an old dilapidated picket fence in the background. I took a shot at f/22 and was able to get the entire scene in sharp focus, as seen in this image,


Periwinkle Patch, Soberanes Canyon, © Greg Clure

although I like the image as a good representation of the entire flower patch and fence, I did not like the fact that the flowers appeared so small. I wanted to show the detail in the flowers which meant I needed to get closer to them as they are only about an inch across. I tried another shot, vertical this time; again at f/22 and I repositioned myself about a foot from a grouping of the flowers, and got this shot,


Single Focus Point, © Greg Clure

the foreground flowers look great but the middle ground flowers and background fence are thrown out-of-focus. Not that there is anything wrong with that as it is a perfectly pleasing image. The problem is when you get this close to your foreground even at your smallest aperture you cannot render the entire scene from near to far in sharp focus. I wanted the fence in sharp focus because it has some interesting detail I feel adds to the overall image. But, the closer you get to your foreground subject the shallower your depth of field becomes with any lens. Your simple solution is to take several images of the scene at different focus points and blend them together with software. In my final image, I used three focus points, one for the foreground flowers, one for the middle ground plants and flowers and one for the background fence and cypress trees. I used Photoshop to blend the sharpest areas of each image into a single image with sharp focus from foreground flowers to background fence, as seen here.


Periwinkle Potpourri, Soberanes Canyon, © Greg Clure

It is all automated and accomplished in a few simple steps. I use Lightroom for most of my editing work so we will start with selecting the three images there:
  1. Select all images to be blended in Lightroom, in my case, I had three images but you can have any number of images with different focus points.
  2. With your mouse pointer over one of the selected images, right click your mouse and select >Open as Layers in Photoshop. This will launch Photoshop and open each image in a separate layer.
  3. Next, highlight all layers in the Layers Pallet
  4. Next, choose >Edit>Auto-Align Layer, this will make sure each image is aligned at the pixel level. In the dialogue box, use the Auto setting for Projection and uncheck the two Lens Correction settings.
  5. Next, choose >Edit>Auto-Blend Layer, you will want to select the Stacked Images option in the dialogue box as well as the Seamless Tones and Curves option. Here's where Photoshop goes to work and creates the black and white masks for each image, white areas are the sharp areas that you will see and black areas will be hidden.
  6. Finally, combine all your layers into a single image by going to >Layers>Merge Layers
You can continue to edit your final image in Photoshop or save the image and return to Lightroom for further editing. That's it! Simple! Give it a try! For a larger more detailed verion for these images go to my web gallery, www.gregclurephotography.com/california-big-sur-central-coast