Thursday, February 13, 2014

Topaz Labs Simplify - 50% Off Sale

50% Off Until 2/28, NOW $19.99
w/ discount code "febsimplify"
Regular price $39.99

Digital Art and Painting

The Topaz Simplify plug-in allows you to create stunning art from photos by transforming regular digital images into beautiful works-of-art. With Simplify, you can achieve a variety of creative art effects including: watercolors, textured oil paintings, cartoon-like images, abstracts, charcoal drawings, line art, and photo-realistic paintings - giving your photography a true creative edge.

The unique size-based technology in Topaz Simplify processes your photo in the same way a true artist would: it eliminates detail-clutter and leaves behind only the essence and natural structure of the photo. By selectively removing unnecessary image clutter, Simplify helps you create a bold and powerful piece of art in just a few clicks.

Here's an example using one of the available pre-sets, just with one click of the mouse, I went from a detailed photograph to a less detailed more painterly watercolor look. The possibilities are endless as there are tens of thousands of variations possible.

Original
Topaz Simplify Watercolor Pre-set Applied


As with any Topaz product you can try it before you buy it, download a free 30 day trial version to see if Topaz Simplify is right for you.

Better yet, if you are new to Topaz, this product is included in their Complete Collection where you get all 14 Topaz products at a super discount, use my discount code, gclure and save an additional 15% off the Complete Collection.

Friday, January 31, 2014

Pro-Tip #14: Get Creative: Long Exposure Photography


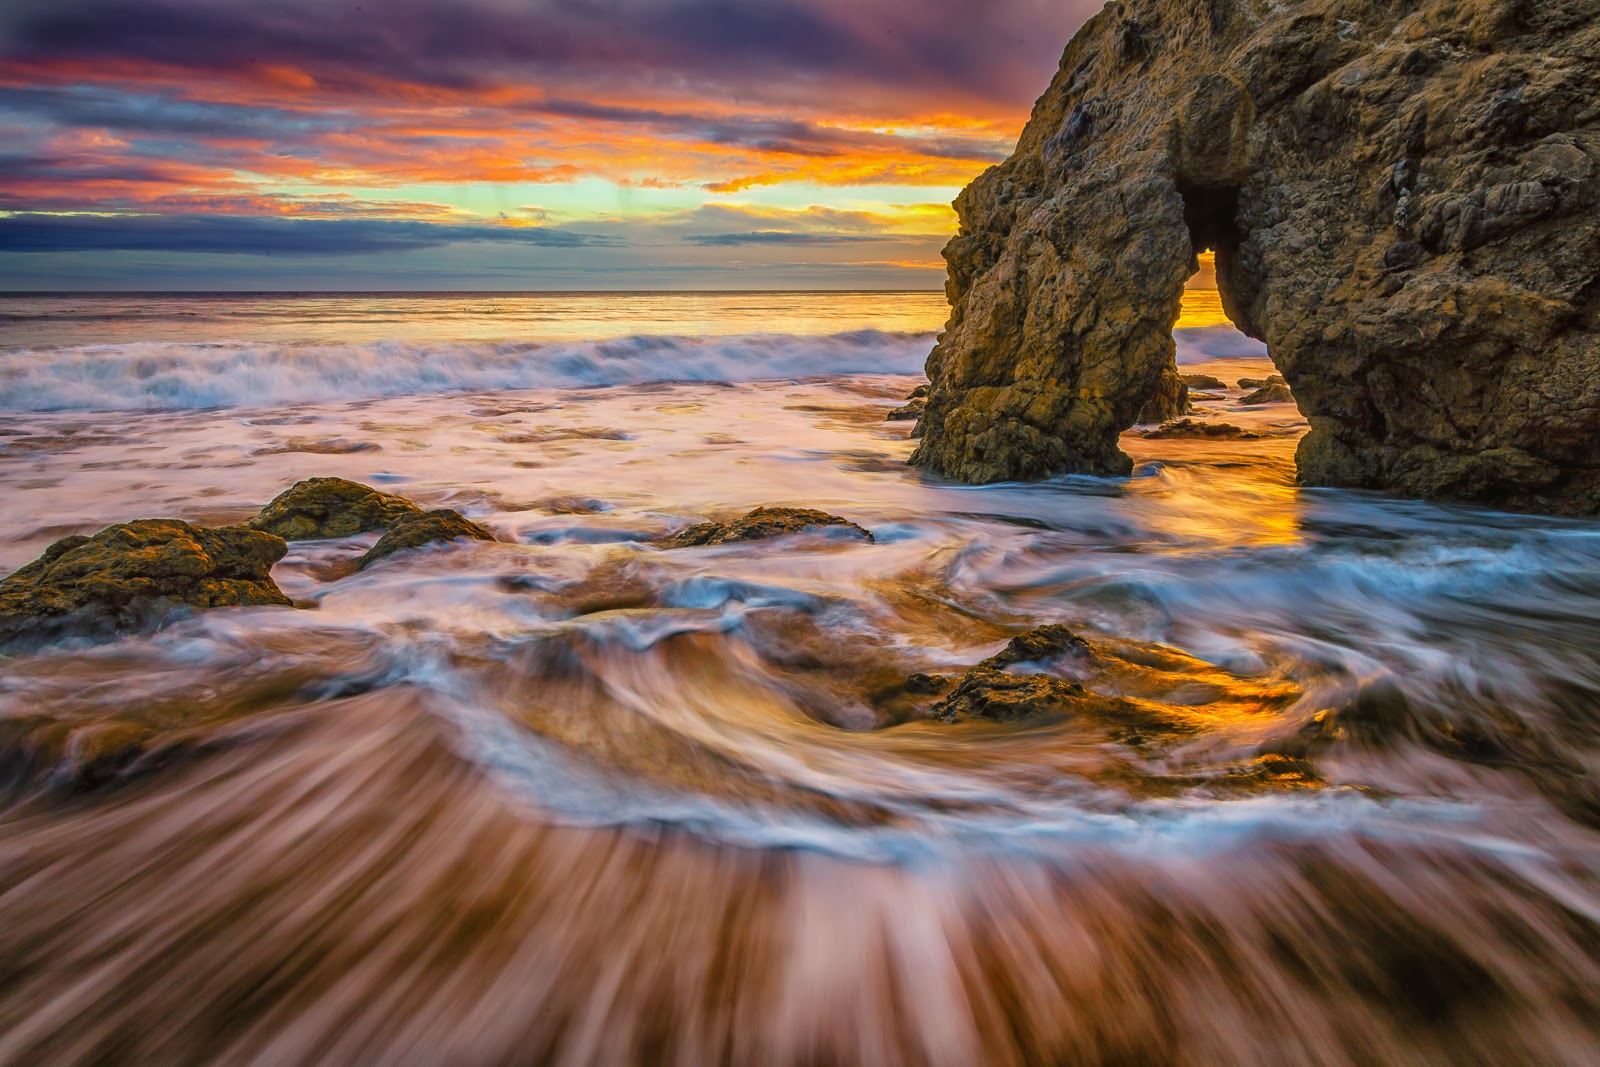
Golden Arch Sunset - f/13@30 sec., 9 stop ND filter


     Last month's Pro-Tip was about getting creative so your images will standout from the other 880 billion photos that are expected to be taken in 2014. An easy way to turn an ordinary image into an extraordinary image that standout from others taken in the same location is with long exposure photography. So what is it and how would it make my photos stand out?
     A long exposure can be thought of as any shutter speed where the photographer cannot hand hold the camera without getting unwanted blur due to camera shake.  These are typically shutter speeds longer than 1/30th or 1/15th of a second.  The aim of long exposure photography is to introduce some creative blur as a result of a moving subject.  Moving water is a classic subject of this technique as are star trails and traffic head and tail lights.
     A couple of pieces equipment will be need to help you capture long exposures; 1) A camera support, typically a tripod, will be needed because hand holding your camera will not be possible, and; 2) A neutral density (ND) filter will be useful in photographing brighter scenes and allow you a choice of longer shutter speeds.
     What camera settings should I use for the best blur? Well, this is where taste and personal choice come into the creative process.  Blur will be affected by three major factors, 1) Speed of your moving subject, 2) The distance between your lens and moving subject, and; 3) Shutter speed. Because you are looking for long exposures you will typically be setting your ISO to its lowest setting and your aperture will typically be closed down to its smallest setting which will give you the slowest possible shutter speed for your lighting condition.  If you are unable to get a slow enough shutter speed you can add a ND filter.
     Personally, I like to try various shutter speeds as each will give a different look and feel to the moving subject and it is hard to tell which you might like best by looking at the back of your camera.  The above image was a 30 second exposure but I took others from 0.3 seconds to 20 seconds and liked the results of several others in addition to this one.  You can see the others in my on-line gallery at Greg Clure Photography.
     My intent is not to provide you with everything there is to know about long exposure photography, as books have been written on the topic, but rather to get you to think about using it as a means of getting a different result and ultimately a better result than the standard fast shutter speed snap shots that will be taken by others. Be creative with slow shutter speeds and capture some unique and more interesting images.

Tuesday, December 31, 2013

Pro-Tip #13: Get Creative

I recently read an article on the web projecting the number of photos to be taken in 2014, and the numbers are so large its hard to wrap your mind around them. It is projected the world will take 880 billion photos in 2014. The world has definitely embraced the digital image revolution and most of us always have a camera with us these days. We are also sharing many of those photos on-line, Facebook gets 208,300 photo uploaded to it every minute and Instagram receives 27,800 per minute. In a seemingly infinite supply of images how do you make yours standout in the over crowded cyberspace?

Creativity is the answer. The vast majority of the 880 billion image to be taken in 2014 will likely be done by raising the camera to eye level set on auto and pressing the button. No thought, no creativity, no one will notice them. If you want to get your images to standout from the crowd than you need a more creative approach. The following fixes are simple and easy to do but you just have to think about them before you press the button. I put these creative fixes into four major catagories:

  1. Camera Position - After you snap that eye level shot ask your self if a higher or lower camera position might improve your photo. Perhaps you can move left or right for a better composition. This is the simplest of actions to do and can take a very unnoticeable image to one that gets noticed because its different than all the rest.
  2. Angle of View - Is the scene before you best shot with a wider than normal view or perhaps a narrower angle of view.  You don't have a zoom lens, zoom with you feet. Most any camera can take a panorama these days for an ultra-wide angle of view. Wide angles are great for showing the grand scenic view and allows you to include a close foreground through distant background and introduce some depth into your images.  While a telephoto excels at isolating your subject and compressing distances.
  3. Exposure Settings -  I am not talking about getting the correct exposure--that's a given, but adjusting your shutter and aperture creatively to enhance your image. Will the subject before you benefit from a fast or slow shutter? Do you need to isolate your subject with a narrow depth of field or do you need to maximize what's sharp from near to far.
  4. Timing - Are you at your location at the optimal time? This may be out of your control but I am talking about what is going on with the light and weather. Can you come back at sunrise or sunset? Perhaps a night time shot that includes the moon or the Milky Way would likely be  less common than the standard day time shot. Do you have clear blue skies, then come back when some clouds are out--clouds make most any shot better with their presence.
There are many other ways to get creative but these are the simplest and easiest to implement and only require a little bit of quick thought before pressing the button.  Anyone can do them but most will not.  So when you do them, your photos will standout that much more the eye level no thought photos making up the majority of the 880 billion photos competing for attention.

Tuesday, December 10, 2013

Topaz Star Effects on SALE for $14.99


Turn an ordinary sunset into an extraordinary sunset with Topaz Star Effects. Apply brilliant light rays, add dazzling sun flares, and create the best star and lighting effects you've ever seen. Make your photos exceptional with Topaz Star Effects.

I like the sun star effect, as you can tell if you have ever browsed through my on-line portfolio at www.gregclurephotography.com, which is basically a form of lens flair that looks good versus the kind of flare that can ruin an image. Creating this effect in camera is often difficult and sometimes impossible depending on the ambient light conditions and requires a lot of trial and error to get just the perfect amount of flair. Topaz Star Effects takes all the guess work out of creating the perfect sun star effect in your images with precise and intuitive controls. You choose the number of star points you want, the length of each flair, the color scheme, the amount of aura desired....I think you get the picture! But don't take my word for it, download a free 15-day trial version and try it out on a few of your own images.

Get everything you need to craft beautiful star and light effects in your photos:
  • Select stunning effects you won't find anywhere else
  • Auto-detect light sources to accurately apply in a single click
  • Customize and tweak your effect until it looks perfect
Not every photo needs or looks good with light effects, but the ones that do simply look phenomenal. Use Star Effects to easily apply these to your own images, and get 50% off with the coupon code "decstar" until the end of the year! Regular price is $29.99, SALE price is just $14.99.

Sunday, December 1, 2013

Pro-Tip #12: Shoot in RAW

On my photo workshops I conduct regularly, I always run into someone not shooting in RAW. Typically, they’ve recently stepped-up to a DSLR from a point-and-shoot camera that did not have this file format or they don’t understand the benefits even though they have heard over and over that you should be shooting in RAW. But do you know why it’s so important? And what it really means for your images? Let’s sort it out!

First off, what is RAW? RAW is a file format that captures all image data recorded by the sensor when you take a photo. When shooting in a format like JPEG image information is compressed and lost. Because no information is compressed with RAW you’re able to produce higher quality images, as well as correct problem images that would be unrecoverable if shot in the JPEG format.

And happily many cameras these days shoot RAW, including some point and shoots! So even if you’re using a little camera, you might still be able to take advantage of the RAW file format (just check your camera manual to see!).

So, the benefits. Let’s look at the big ones…

1. Get the Highest Level of Quality
This is one of the biggest benefits. When you shoot in RAW you record all of the data from the sensor. This gives the highest quality files. And when it comes to your awesome images, you want high quality.Look at it this way: all cameras technically shoot RAW. Yes, it’s true.The difference when you shoot in JPEG format is that the camera does it’s own processing to convert the RAW information into a JPEG.

However, your camera is nowhere near as smart as your brain, nor is it as powerful as your computer. When you shoot RAW, you’re able to do that processing yourself. You can make the decisions on how the image should look, and produce way better results.

2. Record Greater Levels of Brightness
Levels of brightness are the number of steps from black to white in an image. The more you have, the smoother the transitions of tones. Smooth is good.

JPEG records 256 levels of brightness, and RAW records between 4,096 to 16,384 levels! This is described with the term “bit”. JPEG captures in 8bit, and RAW is either 12bit or 14bit.
The effect this has on your images is huge. Those additional steps of brightness let you make more adjustments (exposure, black levels, mid-tones, recovery, contrast, brightness) to your image without a significant reduction of quality, because there’s more levels to work with!

It’s also easier to avoid or correct posterization in your images when you shoot in RAW. Posterization is the banding that you often see in bright skies, which really doesn’t look good in prints!

3. Easily Correct Dramatically Over/Under Exposed Images
Obviously you want to get the best exposure in camera, but sometimes things move fast (especially with wildlife!) and you wind up with a dramatically over or under exposed image.

With RAW you have additional information in the file, so it’s much easier to correct the image without a drastic reduction in quality. You can also recover more blown highlights and clipped shadows. Good stuff.

4. Easily Adjust White Balance
When you shoot JPEG the white balance is applied to the image. You can’t just easily choose another option. With RAW the white balance is still recorded, but because you have way more data, it’s easy to adjust.

Great white balance and color are essential to an awesome image, and shooting RAW lets you make the adjustments easier and faster, with better results.

5. Get Better Detail
When you shoot RAW you have access to sharpening and noise algorithms in a program like Lightroom that are way more powerful than those found in your camera.

Plus, these sharpening and noise algorithms are always improving, so in the future you’ll be able to re-visit your RAW files and take advantage of these improvements.

6. Enjoy Non-Destructive Editing
When you make adjustments to a RAW file, you’re not actually doing anything to the original data. What you’re doing is creating a set of instructions for how the JPEG or TIFF (another file format) version should be saved.

The awesomness of this is that you never ever have to worry about ruining an image, accidentally saving over, or being unable to go back and make changes. You can always reset your adjustments, and start over again.

JPEG files lose quality every time you open them, make adjustments, and save again. True story. It’s what is known as a “lossy” file format. So if you’re making edits to JPEGs you always have to be duplicating the image and saving out a new version if you don’t want to lose file quality. Hassle.

7. Get Better Prints
Because of the finer gradation of tones and colors you’ll get better prints from RAW files. Even though more and more people are shooting digital, great prints are as important as ever (maybe even more so, due to their relative rarity!)

8. Select Color Space on Output
Color space is a bit of a complex topic, but here’s a quick tip. With RAW you can choose from any color space when you are exporting it out, so you can adjust depending on the situation!
Is the image going on to the web? Then output in the sRGB color space to ensure maximum compatibility among web browsers.

Are the files heading to a client? Save it in the common Adobe RGB (1998) color space.
Do you want the widest color space possible? Use ProPhoto RGB.
Basically there are different color spaces that work best for different situations, and when you shoot RAW you can export a single image in multiple spaces! Sweet!

9. Have an Efficient Workflow
It’s easier to work through large batches of images when you’re using a workflow centric program like Lightroom or Aperture. They’re designed to easily process groups of RAW images. Photoshop is not meant for that kind of thing, it’s built to handle one image at a time. In order to take full advantage of all the benefits of Lightroom and Aperture you should be shooting RAW!

10. It’s the Pro Option
Professionals should be providing their clients with the highest quality possible. Issues like banding and blown highlights are big deals when you’re offering your clients printed products. Achieving proper color balance, and choosing the right color space for the situation are critical as well.

By shooting RAW you take control, and are able to manage these problems to create the best results possible. Now that some point and shoots are capable of shooting RAW, most everyone can take advantage of this pro level option, and get better files and prints! Good deal.

Downsides and Solutions
Now, there are always pros and cons to every option, and RAW does have a few downsides. We’ll chat about those, as well as some potential solutions!

Need To Be Processed
A common argument against shooting RAW is that because the files need to be processed, it takes more time to shoot RAW than JPEG. If you don’t do any processing to your JPEGs that might be true.
However, most photographers do some level of processing to their JPEGs so already the argument is getting flimsy.

Then, when you add in the fact that adjustments like white balancing, and recovering highlights and shadows are way faster with RAW files, and it actually begins to look like processing RAW can be faster than JPEG!!
Then, with RAW, you can easily export to JPEG, as well as convert to various sizes (like web res) at the same time. If you really wanted you could even shoot RAW + JPEG simultaneously!
RAW gives you way more options, and can be processed just as fast, if not faster, than JPEG.

Takes Up More Space
Since RAW files have more uncompressed information they can be 2-3 times larger than JPEG files. This is definitely a concern for many shooters, especially those who create a lot of images.
But over the past few years, the cost of hard drives has really dropped, and they’re incredibly affordable!
Let’s consider a 1TB hard drive.
  • A 1TB drive costs about $55
  • If a large JPEG file is about 8MB, you’ll fit 125,000 images on the drive, at $0.00044/image
  • If a RAW file is about 30MB, you’ll fit 33,333 images on the drive, at $0.00165/image
Obviously you can store fewer RAW files, but the number of images that you can cheaply store is so large for both formats that it’s not really an issue! It’s also probably a good idea to not place so many images on a single hard drive. Don’t put all your photographic eggs in one basket!

Memory cards are the same deal. They’re constantly dropping in price. Remember when a 2GB card was over $200?? Nowadays you can hardly even buy one that small, and 16GB is as cheap as $15. Madness!
Yes, RAW files are bigger and take up more space. But that’s because they’re of higher quality. Go with high quality for the extra $0.00121/image.

Slows The Camera Down
RAW files are larger than JPEGs, so they’ll fill up the buffer of your camera faster. The camera will still shoot the same frames per second, regardless of whether it is RAW or JPEG, but you may have to wait for the camera to write to the memory card if the buffer fills up.

If shooting fast sequences if critical for you, and you want to shoot RAW, you can purchase faster memory cards, or a more expensive camera with a larger buffer.

In A Proprietary Format
RAW files are often recorded in a proprietary format, which means that the camera manufacturers haven’t officially disclosed how the raw data can be converted. Companies like Adobe either need to license software to decode the RAW files or reverse engineer how the files should be converted. (For Canon cameras the RAW format looks like .CR2 and for Nikon it’s .NEF).

The problem here is that you can’t be certain that in 5, 10 or 20 years you’ll be able to easily open that RAW file if you don’t have the proper software to decode it!

A open source RAW format has been developed in order to overcome this obstacle. It was developed by Adobe and is known as DNG (Digital Negative). Using a program like Lightroom, you can convert your proprietary RAW files into the open source DNG format. It’s an extra step, but it will ensure your files are readable far into the future!

Already the Leica M9 shoots in the DNG format, so look for more camera manufacturers to support this open source format in the future!

Wrap It UP!
Hopefully this look at RAW and it’s benefits has cleared things up a bit! Suggestions that RAW takes too long, or is too much work, don’t really hold water anymore.

These days, it’s super duper easy (and fast!) to process RAW files, and you’ll be able to get the absolute best quality out of those images that you put so much time, effort and love into!

Monday, November 25, 2013

Topaz Complete Photography Collection SPECIAL

Black Friday, Cyber Monday Special 

The Lowest Price of the Year!

Regularly $379.99  

SALE $199.99, use code "blackfriday2013"

Topaz Labs plug-ins are among the hottest Photoshop add-ons and best overall deal right now, for the following reasons: 64-bit-compatible, low prices, unique and useful effects and very active participation by the developers in the user community. The developers are constantly updating and improving the products, and upgrades are free for existing customers!

You can save a large amount of money by opting for the Topaz Complete Collection at $199.99, normally $379.99, a
$570 SAVING, over buying these 14 plug-ins/apps individually. This is THE BEST PLUG-IN DEAL in the industry, considering the wide range of image effects and enhancements they make possible.


You get all 14 plug-in packages for one amazing low price! Here's what's included:

Topaz ReStyle is the newest addition to the Topaz line-up. There are plenty of tools that help you achieve a specific look in your photos. But Topaz ReStyle is different – it gets you results that you wouldn't have thought of otherwise. So next time you're staring at an image after making some minor adjustments and it's just not quite there, try using ReStyle to jump-start your creativity.

Topaz Clarity lets you spend more time shooting and less time post-processing by applying one of over 100 presets. These one-click effects were specially developed and fine-tuned for specific types of photos. Instantly add extra depth to your architecture images, wedding photos and everything in between.

Topaz B&W Effects takes you beyond traditional black and white conversion methods by integrating unique features like a 5-in-1 selective adjustment brush, adaptive exposure, quad toning, historical processing collections, creative effects and more.

Topaz Adjust is the easiest way to make your photos pop. Perhaps the most popular plug-in in the industry right now, Adjust optimizes image exposure, color, and detail strength for stunning image results. Quality exposure adjustment in Photoshop is cumbersome and sometimes frustrating. Adjust makes this process simple, fun, and highly rewarding. Other developers charge up to and over $595 for this type of plug-in, and they offer far less functionality!

Topaz ReMask is the fastest way to mask and extract your images. ReMask harnesses the latest in image extraction technology to make masking intuitive and powerful. Unlike Photoshop's sometimes clumsy and hard to use extraction tools, ReMask makes photo extraction and masking easy and sizzling fast.

Topaz Detail gives full control and precision over all aspects of detail manipulation without creating any edge artifacts or halos. Unlike Photoshop's detail enhancement techniques, Detail effectively accentuates three levels of detail without the slightest trace of artifacts or haloing.

Topaz Simplify provides creative simplification, art effects, and line accentuation for easy one-of-a-kind art. In contrast to built-in artistic filters in Photoshop, which are limited to certain specific effects, Simplify creates a wide range of stunning artistic effects in a simple, intuitive, but powerful interface.

Topaz DeNoise offers a complete noise reduction solution that removes far more noise and preserves far more detail than other solutions. Noise reduction is one of our core competencies, and DeNoise displays that brilliantly. Use state-of-the-art noise reduction abilities to make your formerly noisy photos clean, clear, and crisp.

Topaz Clean provides unique smoothing and edge stylizing capabilities not found anywhere else. It can quickly add interesting flair to photos and can be used to both smooth out detail and stylize edges. Use Clean for exceptional results on portraits, weddings, and other people photos.

Topaz DeJPEG drastically improves the quality of web images and other compressed photos. Although Photoshop includes a simple JPEG fixer, it doesn't preserve as much quality as possible. DeJPEG makes sure that any compressed image looks as good as it possibly can.

Topaz InFocus is the comprehensive solution for your sharpening and deblurring needs. Infocus recovers lost detail, refines with micro-contrast enhancement and restores clarity to blurry images. Unlike unsharp masking, InFocus sharpens without distracting high-contrast edges.

Topaz Lens Effects simulates realistic lens, filter and specialty camera effects.

Topaz Star Effects creates unique star and lighting effects by manipulating and enhancing the appearance of various light sources found within your image. With a variety of fully-customizable effect options for modifying light sources, you can easily add a creative or dramatic flare to lights or reflective surfaces to focus more attention on those point.


Topaz photoFXlab With instant access to all of the Topaz plug-ins, photoFXlab easily connects you to all of your Topaz effects in a searchable library. Featuring a layered workflow with masking capabilities, selective enhancement brushes with edge-aware technology and a fun new way to InstaTone your images, photoFXlab"! is the new way to experience Topaz.


Tray Radcliff of Stuck in Customs, says these plug-ins are the secret sauce that makes his images pop and saves him loads of time in post production. Join the pros with professional creative results when you start creating and stop processing by employing these cutting edge plug-ins. What are you waiting for, give yourself the gift of time by using these plug-ins for creating results you never knew were possible. 

Friday, November 1, 2013

Topaz B&W Effects 50% off SALE


Save 50% on Topaz B&W Effects, Novemeber 5 - 19, 2013, with code "novbw". Regular price, $59.99, SALE price, $29.99.

You've probably seen or maybe even created a black and white image that just didn't have the impact you expected. Without color, creating a striking image can be a challenge. When you remove color you eliminate an aspect of detail. So with black and white photography, the details, textures, lines and composition of your image take on even more importance.
Topaz B&W Effects helps you bring out these essential features, while balancing the range of gray tones, adding dynamic contrast and selectively enhancing the tonal range of blacks and whites in your image.
  • Unique Effect Collections with historical, traditional and stylized looks
  • Over 200 presets included for a quick and creative 1-click workflow
  • Adaptive Exposure integration for dynamic detail, contrast and tone
  • Edge-aware selective brush for quick and easy selective detail and color
  • Authentic grain engine developed from real film scans
  • Creative Effects integrated from Topaz Simplify, Adjust and Lens Effects
  • Split-screen preview options for easy before and after comparison
  • Stage-based interface layout for a simple and streamlined workflow

Topaz B&W Effects includes over 200 presets that can be applied to your image with aclick. These effects make your black and white conversion process quick and easy. After applying a preset, you can tweak the adjustment settings to develop your own unique look and then save these new settings as your own preset.
The presets included in Topaz B&W Effects are organized into 8 collections, each offering a different style of effects from traditional Silver Gelatin to stylized. Unique to Topaz are the Van Dyke Brown Collection, Cyanotype Collection, Opalotype Collection and the Albumen Collection, which all simulate historical printing processes. This allows you to give your images an authentic look and feel. 
Topaz B&W Effects is easy for new users but powerful and flexible enough for advanced pros. It features a stage-based interface layout that organizes all your conversion, enhancement and finishing tools into manageable steps to help ease you through the editing process.
There are 4 main adjustment tabs for each stage of the workflow and each contain sub-tabs with your individual adjustment tools. Disable or enable the preview for the sub-tab to see your image with or without the added effects.


As with any Topaz product you can try it before you buy it, download a free 30 day trial version to see if B&W Effects is right for you.

Better yet, if you are new to Topaz, this product is included in their Complete Collection where you get all 14 Topaz products at a super discount, use my discount code, gclure and save an additional 15% off the Complete Collection.