Depth or the feeling of depth is a compositional element used to trick the brain in thinking a flat piece of paper (or screen) has three dimensional qualities. Here are five common effects the pros use to create depth:
Relative Size Effect - Include a distinct foreground, middle ground, and background in your composition. Elements in the foreground look larger than those in the middle ground which look larger than those in the background creating a sense of depth. This is often accomplished with a wide-angle lens and by getting down low and close to your foreground which has the effect of making it appear larger than life while the middle and background appear smaller than normal accentuating depth.
 |
| Cascade Detail, North Creek, Zion NP - © Greg Clure |
Here in my Cascade Detail example of this effect, my camera lens is about 12 inches from the water cascading over the sandstone terrace and about 18 inches off the ground, so I am low and close to my foreground which comprises the bottom half of the image. The middle ground is the next quarter up and includes the creek bed and upper terrace water falls and background is comprised of the trees and cliffs in top quarter of the image. A vertical or portrait orientation does the best job of capturing depth when using this effect as it provides more near to far real estate to illustrate the scene's depth.
Elevated Effect - Often used in combination with the above effect, gaining elevation helps by visually separating the foreground, middle ground, and background, which makes perspective lines and size comparisons more apparent.
 |
| Ice Cream, White Pocket - © Greg Clure |
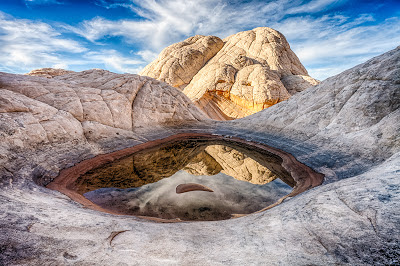 |
| Pocket Reflection, White Pocket - © Greg Clure |
The pool in both these images are one and the same which might not be apparent at first glance. In my Ice Cream image I climbed up to an elevated vantage point about 10 feet above the pool which provides greater separation of elements than the low and close view at pool level image titled Pocket Reflection. This elevated vantage point also allowed me to include a more distant sunlit butte in the background not seen in the Pocket Reflection image.
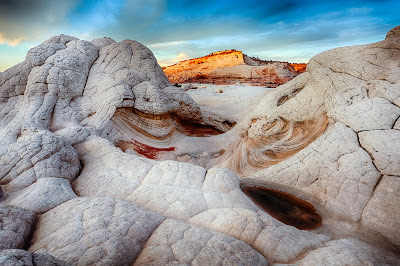
Atmospheric Effect - The use of haze or fog creates depth by obscuring more distant objects even if those object are not all the far away.
 |
| Toroweap Sunset - © Greg Clure |
In my image, Toroweap Sunset, I am demonstrating all three of the effects discussed so far in a single image as we have a distinct foreground, middle ground and background. I am close to the foreground rock ledge. I am shooting from an elevated location, 3000 feet above the Colorado River and the canyon walls and distant buttes are obscured by the haze and recede into the distance enhancing the feeling of depth and size of the Grand Canyon.
Juxtaposition Effect - While similar to the first effect discussed, this effect uses a prominent foreground juxtaposed to the background. The reduction or elimination of a middle ground creates a strong sense of depth by accentuating distance.
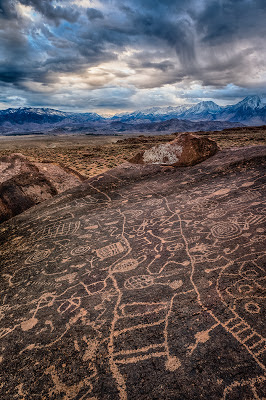 |
| Stormy Sierras - © Greg Clure |
In my Stormy Sierras image I am juxtaposing the foreground petroglyphs against the distant Sierra Range and dramatic storm clouds. While you could say there is some middle ground here, the slice of open brush land between the petroglyphs and the mountains, it is not a significant or important part of the image. So this image is really two-thirds foreground and one-third background and goes a long way to enhancing the sense of distance.
Perspective Effect - Include leading lines, S-curves and converging lines in your images as these visual cues of perspective are easily associated with depth or distance.
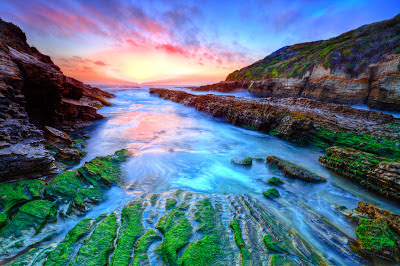 |
| Playa de Verde - © Greg Clure |
My Playa de Verde image is a good example of leading line and they are mostly all converging toward the setting sun. There are line of mossy rocks and lines of blue water between those rock all pointing toward the sunset. The prominent rock jetty ends just before the sun. The bay waters channel the ocean waters on both sides of the jetty towards the sun. The flaring sun rays and V-shaped hillsides point toward the sun. All these lines and others seemingly point to and converge toward the setting sun. This image also exhibits four of five effects discussed and tells a convincing story of depth and distance.
So what are you waiting for, get out there and and capture that third dimension of depth in your landscape images and breathe some life into your two dimensional photos.


